Table of Contents
Do you want to activate embedded SIM (eSIM) on your iPhone? This article is for you.
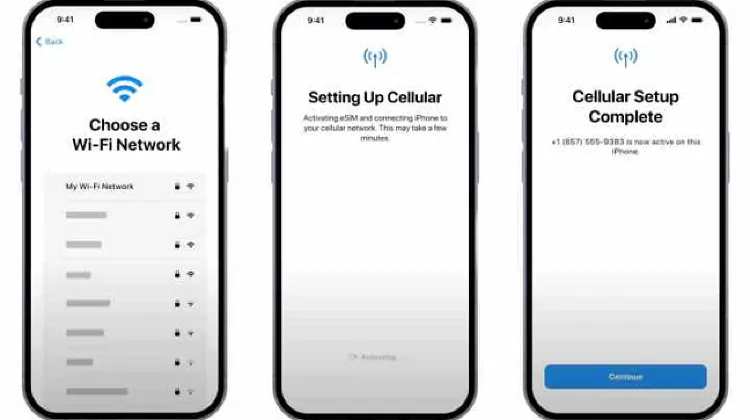
The eSIM technology is transforming how we activate and manage cellular plans, as this innovation offers flexibility and convenience that makes it different from physical SIM cards. Therefore, this article gives you a guide on installing and activating your eSIM on your iPhone.
Ways To Install eSIM On iPhone Device

1. Direct Installation
Apple has streamlined the installation of eSIMs by Apple Universal Links through the introduction of iOS 17.4 and or later software updates. This method simplifies eSIM activation, eliminating the need for physical SIMs or manual configuration. Here, click on the Universal Link you receive from your eSIM provider for installation. The link is embedded with the SM-DP+ Address and Activation Code, which is essential for setting up your eSIM.
2. QR Code Installation
This process requires scanning a QR code containing all the details for your eSIM configuration and activation. The steps here are as follows:
- Open iPhone “Settings” and click “Cellular.”
- Choose “Add Cellular.”
- Select “Use QR Code” and scan the code provided by the eSIM card.
- Label the new eSIM and set your preferences for calls, messages, and data as required.
3. Manual Installation
You can manually activate your eSIM on iPhone, which is also part of the method for installing the eSIM technology on Android phones. Simply enter the activation code and SM-DP+ address. After that, follow these steps:
- Go to “Settings” then “Cellular.”
- Click “Add New Cellular Plan.”
- Choose “Enter Details Manually.”
- Enter the “SM-DP+ address,” “activation code,” and any other required information.
- Follow the prompts to integrate eSIM into the iPhone Data Plan.
- Label the eSIM and configure calls, messages, and data usage.
- Check your iPhone device to confirm the activation.
How To Activate Your eSIM Line On iPhone During Travel
Step 1: Turn On Your eSIM Line
- Open the Settings app on your iPhone.
- Choose Cellular or Mobile, depending on your iOS version.
- Locate the eSIM line you installed – which you can find with a label name.
- Toggle the switch next to Turn On This Line to the On position.
- Your iPhone is ready to connect to a mobile network through the eSIM.
Step 2: Enable Data Roaming
You must enable data roaming to use data services at your travel destination. The follow these steps:
- Stay in the Cellular or Mobile settings.
- Navigate to find Data Roaming.
- Toggle the switch next to Data Roaming to ON.
NOTE: Roaming charges may apply; it is important to check the roaming rates with your eSIM provider to avoid charges you don’t expect.
Step 3: Connect To A Network
Your iPhone automatically finds and connects to a local network after enabling the eSIM line and data roaming. But if it doesn’t connect, here are the steps to take:
- Go back to the main Settings menu.
- Click Carrier or Network Selection.
- Turn off Automatic selection.
- Wait for a list of available networks to display.
- Choose the network that corresponds with your eSIM provider or the strongest local network.
Frequently Asked Questions (FAQs) About Activating eSIM On iPhone
What iPhone Models Support eSIM?
Some iPhone models support eSIM, just as we have Android phones that are compatible with the technology. These models include the iPhone XS, XS, Max, XR and later models. They integrate eSIM to allow users to activate cellular plans digitally.
However, you can check with your network provider for eSIM compatibility and support, as this can vary depending on location and other factors.
Can I Convert My Physical SIM To An eSIM On My iPhone?
You can convert a physical SIM to an eSIM, given that your iPhone model and network support this feature. To do this, go to “Settings,” then “Cellular,” and choose “Convert to eSIM.” Follow the prompts, which can include scanning a QR code or manual activation of the eSIM.
How Can I Transfer An eSIM From One iPhone To Another?
You need a process called “eSIM Quick Transfer” to transfer an eSIM from one iPhone to the other. But you must ensure that the iPhones are updated to the latest iOS version.
On your new iPhone, go to “Settings,” followed by “Cellular,” and choose “Add Cellular Plan.” Your old iPhone will receive instructions on how to transfer the eSIM. Follow the prompts to transfer your eSIM.
Conclusion
eSIM technology continues to evolve to enable integration into new models of phones, such as iPhone devices. The use of eSIM is convenient and flexible, as we have highlighted ways to install the technology on iPhones. But it is essential to contact your network provider to confirm the compatibility of eSIM on your phone as the support sometimes varies with region.
Last updated on December 8, 2024

